ClamWin Free Antivirus Configuration Guide
ClamWin is a free (as in free beer) antivirus program for Windows. It is open source and is licensed under the GNU General Public License of the Free Software Foundation.
ClamWin includes a scanning scheduler, an automatic virus definition database updater, and a standalone virus scanner. It can, likewise, be integrated with Microsoft Windows Explorer and Microsoft Outlook. It does not, however, have an on-access scanning or real-time scanning feature.
Step 1. Install ClamWin Free Antivirus Program- Dowload the latest ClamWin installer. The lastest version is available here.
- Run the ClamWin installer.
- The ClamWin Antivirus Setup Wizard pops up. Click Next.
- The License Agreement window opens. Select the I accept the agreement radio button. Click Next.
- The Select Installation Options window opens. Select the Anyone who uses this computer (all users) radio button. Click Next.
- The Select Destination Location window opens. Click Next.
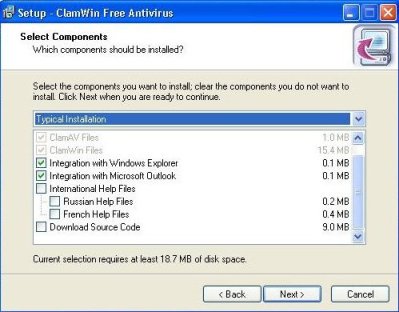
- The Select Components window opens. Select the Integration with Windows Explorer and Integration with Microsoft Outlook check boxes. Click Next.
- The Select Start Menu Folder window opens. Click Next.
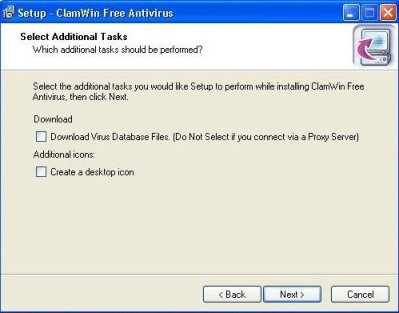
- The Select Additional Tasks window opens. Deselect the Download Virus Database Files. (Do Not Select if you connect via a Proxy Server) check box. Click Next.
- The Ready to Install window opens. Click Install.
- ClamWin installation may take a few minutes. Click Finish.
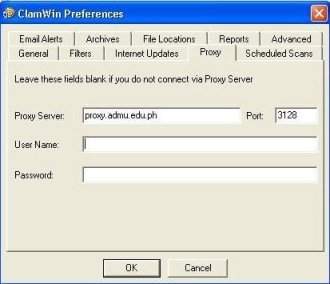
- Click the Proxy tab
- Fill up the fields as follows and click OK: Proxy
Server: proxy.admu.edu.ph
Port: 3128
- Launch the ClamWin antivirus program.
- Click Tools -> Preferences
- Click the Internet Updates tab.
- Select the Enable Automatic Virus Database Updates check box.
- Fill up the fields as follows: Download Site:
mirrors.ateneo.net/software/win32/clamwin/
Update Frequency: Daily
Time: 03:00 PM
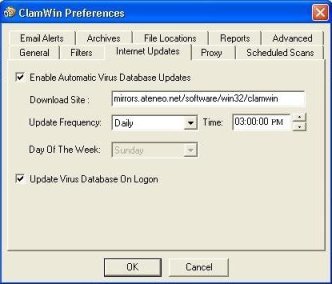
- Select the Update Virus Database On Logon check box.
- Click OK.
- Click Tools -> Download Virus Database Update
- Or simply click on the Update
 icon. Once completed, click Close.
- You can now scan your hard drives and folders for infected files. Click Scan.
- Click the Scheduled Scans tab
- Click Add
- In the Schedule section, type in the following:
Scanning Frequency: Daily
Time: 09:00:00 AM - In the Scan Folder field, Click on the drop down menu.
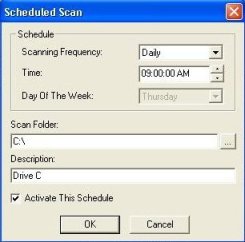
- Select the hard drive you want to scan (i.e. C:\)
- In the Description Field type in a brief description (i.e. Drive C)
- Click on the Activate This Schedule check box. Click OK.
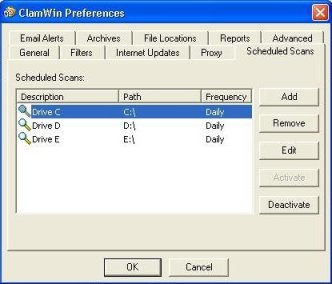
- Repeat the procedure for the other hard drives or partitions.
- Click OK.
![]()